Tampilkan postingan dengan label to. Tampilkan semua postingan

Planking progress stalled by need to encapsulate stem

As January keeps winding on, it seems as though I’ve had a million things to juggle or deal with that keep interfering with my boatbuilding progress.

I am making progress, however.

I’ve gotten the forward starboard plank screwed into position. It is not epoxied on yet, however. The simple reason is the fact that I have not yet encapsulated the stem, which is still bare plywood all the way around. Once the planking is on, it will be very difficult to reach certain parts of the stem in order to coat it with epoxy, (or “encapsulate” it), as protection against moisture. So, I need to encapsulate the stem before I permanently attach the planking.


The forward plank on the starboard side is screwed into position.

Detail view at the stem
In this detail view, you can see the how the added chine strips got blended into the shape of the forward bend in the chine.

Unfortunately, I don’t have on-hand the proper type of epoxy for encapsulation. What I have on-hand is System Three Silvertip Gel Magic. VERY viscous stuff that is great to work with to glue parts together. However, I need something much thinner for encapsulation. I liked the Gel Magic enough that I decided I’d try another System Three product, so I ordered the regular Silvertip epoxy. It should be here early this week.

In the meantime, I have fitted, glued and screwed the butt block into position on the port side of the boat. 

Fitting the butt joint on the port side. Without the butt block in place, the forward plank does not match the curvature of the aft plank.

By comparison, here is the butt joint on the starboard side. The butt block allows the forward planking to match the curvature of the aft planking.

The port side butt block, before being epoxied into place.

The butt block epoxied into position against the aft planking on the port side.

The next step will be to encapsulate the stem & a few other parts with 2 or 3 layers of the Silvertip epoxy. Then, I can permanently attach the starboard planking. After that, the rest of the port side planking.
Read More..

Glass applied now to fill the weave

After three sessions, the hull now is completely covered with 6 oz glass.  I still need to squeegee on two more coats of epoxy and then some sandable filler to smooth out with the long board.  But, pleased with the progress.  i will need to wash the epoxy blush off prior to filling the weave as the port side has sat for over a week and has some evidence of blush.

transom recieves its glass.  Light spots are filler to fair the tape at the seams. 


Christos was here!


Read More..

Fire as an Alternative to TV


I dont want to make too much of the making of and sitting by campfires mainly because it is something that most people who go camping have probably experienced for themselves,and that sitting by a good camp fire is vastly superior to watching TV.  Still, it is something that needs to be said. And I have some theories about why a campfire is better than TV and I will share them with you.  Feel free to disagree.
First of all, the obvious - fire is entertaining in and of itself.  There is drama in a fire.  One knows the plot well enough but never the details.  Wood, at first reluctant to burn for a variety of reasons like wind, lack of kindling, moisture, etc. eventually is made to burn.  Then the fire burns, produces coals and maintenance of the fire becomes easy, one simply throws more wood on the fire and at some point becomes tired of the process and lets the fire die for lack of fuel or actively snuffs it out.  This is the plot of the entertainment known as fire. And there are many variations on it.
The primary reason I prefer fire over TV is that fire has no political or social agenda.  It does what it does. It burns according to various basic rules and thus is educational about the laws of thermodynamics.  Not that looking at fires is what inspired thermodynamicists to come up with their theories, but looking at fires does give one a sense of how fire works and that in itself may give rise to many useful metaphors.  TV on the other hand is almost entirely agenda driven.  Someone is selling you something constantly, obviously through commercials but also in the content that the commercials enable.  Implicit in all story telling is a viewpoint, a lesson, a moral.  Even if nothing obviously new is being communicated, the very fact that the TV portrays some activity is some kind of endorsement for it or a polemic against it.  If you dont agree with the lifestyle choices of the people portrayed on TV then TV watching is a chore.  So fire, much better.
Finally, sitting by a fire with other people is a social affair and as such, becomes a lab experiment in social dynamics.  For one thing, the progress of the fire needs to be managed and as someone once famously said, no two people can ever agree on the right way to poke a fire.  If more than one person wants to manage the fire, a struggle invariably ensues, covertly or overtly.  Words will be said about the management of the fire and a winner in the struggle will emerge.
Enough for now, I have found that the internet has lots of campfire pictures.  I will comment on some of them in future posts since the pictures raise specific points such as preferred ways to arrange the logs, what to wear to a campfire, safety issues around the campfire, what to talk about at a campfire, how to cook on a campfire and more.

Read More..

Unangan Single Bladed Paddle to Double Conversion and Back Again

When I first saw this picture of a double bladed paddle, I thought it was a new Aleut type.  And so I made a copy of it.  As it turned out, it was too short for me and I never used it after its original trial. Later, the photo showed up on some forum and somebody perceptive pointed out that the double bladed paddle looked like it was two single bladed paddles lashed together, possibly after having been sawed to better fit together. Sure enough, if you look carefully, you can see the lashing that made one paddle out of two.  The picture was taken at the Chicago Field Museum when it was the site for the World Fair.
The problem with using a single bladed blade shape for a double-bladed paddle is that the single bladed paddle is designed to be used more or less vertically so that the full blade is immersed in the water at then end of the stroke.  The blade on the double bladed Aleut paddle is widest near the tip so you can get more blade in the water at the beginning of the stroke at a lower blade angle.

Click on the photo for a better view.  Note the single bladed paddle tucked under the improvised double bladed paddle.
Just recently, it occurred to me that the one paddle out of two process could be reversed and if I cut my too short double paddle in half and spliced some more wood to it. Then I could have two usable single bladed paddles instead of just one unusable double bladed paddle.
The double cut in half on a bandsaw. The half on the right already has its extension glued to it. 

And here, a close-up of the sliced portion of the paddle.
Soon as my paddle transformation is complete, I will report on the performance of these paddles.
Read More..

The Zip takes one step closer to reality

Last night, I assembled the breasthook and stem assembly for my Glen-L Zip. From my previous experience of having built stems and breasthooks for two other boats, I decided to use a different technique this time.

In the past, I would assemble the two pieces of the breasthook and let the epoxy cure. Then, later on, I would attach the completed breasthook to the stem. This time, I assembled all three pieces together at the same time, using only one batch of epoxy.

The reason for doing it this way was to avoid having to deal with the bead of hardened epoxy that forms along seams where the epoxy is squeezed out from between two parts. I’ve learned that it’s a good idea to scrape away any squeezed-out epoxy before it cures by using a small, flexible putty knife. Still, if a bead of hardened epoxy forms on an inside corner, (such as in the notch of the breasthook), it can be difficult to remove. It can also cause problems when you’re fitting pieces together.

By putting all three pieces together at the same time, this problem is easily avoided. 

I decided to assemble the breasthook and stem with the same batch of SilverTip epoxy that I was using to encapsulate limbers and underside parts on the Utility. Not much epoxy was required for this small bit of encapsulation. I had a small amount of #2 silica ready to add to the remaining epoxy when I was done. The Zip parts were disassembled and staged, ready and waiting for the epoxy.


Limbers & underside parts of the Utility needed to be encapsulated before I attach the bottom planking. I wont be able to reach these places once the planking is on.

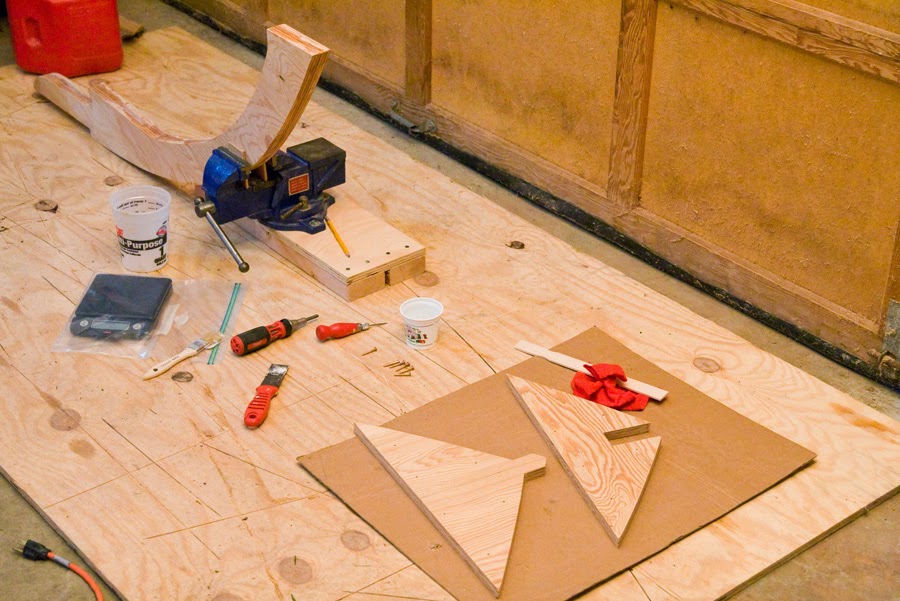
All the Zip parts set to go: stem, mixing cup for epoxy, kitchen scale in a freezer bag, chip brush, screwdriver, putty knife, awl, small container for #2 silica, mixing stick, rag, and both parts of the breasthook.
After encapsulating some small areas on the Utility, I mixed the silica with the remaining epoxy to thicken it for gluing. I spread this mixture on both mating surfaces of the breasthook and on the top of the stem as well. I used an awl to quickly align the holes on the two parts of the breasthook, and screwed them back together. Then, I fitted the breasthook onto the stem, pressed it down firmly, and used two 2.5-pound weights to hold it down into position. Then I scraped away all the epoxy squeeze-out with the putty knife.


The Zips stem
Stem and breasthook assembled, waiting for the epoxy to cure. These parts are all made from 3/4" marine-grade Douglas Fir plywood.


Read More..

Whatever Happend to Do It Yourself


Boat plans from Popular Mechanics Magazine
Whenever I am giving a kayak building demonstration somewhere in a public space, some guy in his sixties or seventies will come up and say, "Yeah, I remember building one of these in the Boy Scouts."  The point worth mentioning here is that it is never a forty or thirty year old or even a fifty year old that comes up and says, "Yeah, I remember building one of these in the Boy Scouts."  My statistical sample isnt very large, but it seems to me that sometime in the post-WWII era, people built stuff and then they stopped.

So what happened? 
I have some theories. 
One of the factors that encouraged the do it yourself movement was prosperity and the high cost of wages.  Since most things consumed in the US were made in the US rather than imported, manufactured goods were relatively expensive because of the cost of labor.  So if you made something yourself, you could save on the cost of labor. Also, since manufacturing was still a big part of the US economy, the skills to make things were still valued and encouraged.  Schools were still expected to turn out graduates that could enter a job market where manual skills were valued. 
Folding kayak built from Popular Mechanics plans
And there were magazines like Popular Mechanics and Mechanix Illustrated to cater to do-it-yourselfers with plans and instructions. It seems like the golden age of  home made projects.
The other factor working against home made boats is the invention of roto-molded boats. This process eliminates most of the human labor from the making of a boat.  Kayaks and canoes can be made in a mold.  A little clean-up and some trim is all that needs to be added to make a finished boat.  The cost of these boats is so low compared to making your own that the effort hardly seems justified from a cost perspective.
Still, various plywood boat kit manufacturers seem to be making a living turning out kits for home builders. But a kit is not the same thing as making something off a set of plans out of a magazine.  I suspect that kits are popular because the general level of confidence to make something by hand has declined considerably since the middle of the twentieth century. 
Read More..

Musings on how to make the seats

The original Glen-L plans call for a seat riser that runs from the forward frame to the transom, passing through this cutout in Frame #1.

So, Im in this "blocking" phase. The next step is to attach blocking on the sides of the hull to support each end of the rear seat. (Basic "bench" seats are also called "thwarts" in nautical terminology.)

The original plans call for a full-length seat riser to be attached to the sides of the hull. Thats the purpose for the unique cutouts on the sides of Frame #1 that youll see on the Glen-L Utility model. So far, there arent a whole lot of well-documented Utility builds. However, among those Ive seen, most do not use the full-length seat riser. Instead, these builders simply attached blocking to support the seats.

The original plans also call for 2 separate aft seats, on either side of the boat. Im not going to do that. I want a simple back thwart, and front thwart.


Glen-L line drawing of the Utility
I debated on the full-length seat riser. However, I decided against it for a few reasons. One is time, as Im now quite anxious to get this boat in the water. Another is the fact that Id have to either cut the frame cutout more, or plane the full length of the seat risers, because my cutout is less than a "store-standard" 3/4" depth. A third reason is the fact that Id also have to make another cutout in the seat riser itself, to accommodate the butt blocks that connect the side panels of the hull.

Nope. Simple blocking it will be.

The next question is, "How to attach it?" I realized that if I install the blocking on either side first, then Im taking something of a gamble on them actually being on exactly the same plane. I do not want my seats to slant, obviously.

The other matter to attaching the blocking on the sides first, is the fact that Id have to retrofit the center support. I have already planned to build a different type of center support than Glen calls for, anyway.

How my center supports will differ:
Glen calls for 2 plywood center supports for the front thwart. These supports are glued to either side of the keel, and then attached to either side of blocking that is underneath the thwart itself. Like this:


Glen-L Utility
A Glen-L Utility at the "G8" Glen-L Gathering in 2014. Thanks to the kindness of this boats owner, I was actually able to drive this one & take one of my children out in it. Note the construction of the center support under the seats.
Im planning to build a different type of center support, based on one I saw in a photo of a 1935 Riva. Mine will have a single plywood support, mounted on top of the keel, on the centerline. I will have 1" x 1" blocking on either side of the plywood support, both at the top and bottom.

Center seat support on a 1935 Riva
Back to the point...
I had another idea. What if I build & install the center support first, then make sure the thwart is level... then, use the thwart itself as a point from which to install the blocking on the sides? It seems to me that Id stand a better chance of having the seat installed level, once its all done.

So first, I marked the sides, where the top of the blocking (seat riser) should be, at right angles to the frame. Then I taped twine from measured points on these lines, stretched across to the other side. Measuring the height from the keel to the twine, I found that each point was 8 inches.


I plan to make the thwart 12 inches wide. I want the center support to be slightly narrower, so I decided it should be 10 inches. Knowing that I plan to use 1" blocking, I then had the dimensions I need to draw out the center support.


Half-breadth of the seat support, drawn out on the computer.
So, I drew the half-breadth of the seat support in Adobe Illustrator & printed the pdf full-size. I then cut out the print & traced it, full width, onto poster board. Once I cut that out, I had a template which I can now transfer to the plywood.

Poster board template for the center support. So far, so good...

The next step is to actually build it. 

Lets hope all this works.


Read More..

Fire Good Fire Bad and Whatever Happened to Pyrodiversity


I recently bought a book called California Indians and Their Environment. California Indians unlike most of the other Indians in what is now the US had never developed any agricultural technologies.  Instead, California Indians made their living exclusively off plants growing wild in their environment.  However, Indians managed their environment by burning practices that encouraged their food and medicinal plants to thrive.
Enter the Europeans.
Fire, an environmental management tool for the Indians was a threat to property for the Europeans.  The use of fires intentionally set  by the Indians, what are now called prescribed fires was outlawed by the Europeans. I imagine that the dwellings of Indians were subject to fire damage just like the dwellings of the Europeans but given  that the Indians set fires to manage the vegetation in their territory did not build dwellings where they would get burned down.  In addition, Indian dwelling may have been more temporary or movable and therefore more disposable or more easily relocated if a prescribed burn was called for.
I have never seen the reasons for antipathy to fire spelled out anywhere in text, but the idea that fire is bad seems almost self evident probably at least in part because of a massive public relations campaign by the department of Agriculture.  The appeals were mostly emotional and aimed at a population that probably had very little contact with forests on a day to day basis. The reasons for preventing forest fires are primarily economical and have little to do with ecological concerns.  Fire is a natural phenomenon and ecosystems have adapted to fire and in many cases depend on fire to keep the ecosystem in balance.  Not so in National Forests managed by the Department of Agriculture.  National forests produce lumber.  The lumber is sold to lumber companies and the Department of Agriculture collects money when the trees are cut down.  Trees that go up in smoke dont produce any revenue and whether by training or by natural disposition, most people, myself included dont like the look of burned over forest. 
The National Park people on the other hand dont sell any lumber and so they can afford to let forest fires burn.  No revenues are lost as a consequence.  Perhaps park attendance goes down during a forest fire but quickly picks up again afterward.  National parks even do prescribed burns since some trees like the giant Sequoias dont reproduce unless the ground is burned over.
But back to the Department of Agriculture anti fire campaign.  While the motivation to prevent forest fires was primarily financial, the advertising campaign instead focused on the fact that forest fires could potentially kill cute baby deer and bears, and so Smokey the Bear was created.
OK, so fire wastes resources, not to mention displacing or possibly orphaning young deer.
Heres the orphaned deer theme again.  no mention of wasted resources this time.
And again, this time, who knows, might be Smokeys nephew thats getting bandaged up there.  Smokey wants to know WHY?
This time, no orphaned animals, but the implication is clearly that those two cubs would be in a heap of trouble if there were to be a fire.  Smokey meanwhile is taking a break from shoveling dirt on top of camp fires to read a fan letter.  In the background, city dwellers recreate on a lake in the woods at a forest service campground in an environment of statuesque ponderosas unmarred by fire.
And for the children, a reminder that theres lots of critters that would be indisposed by forest fires, the advertising campaign bleeding out into the culture at large via childrens books.
And finally, WWII poster.  Needs an update there with Putin and Osama.


Read More..

Back to work

With the successful launch of Perseverance last weekend at G9 behind me, its time to get back to work on getting the little boat finished.

Yesterday, I applied the 2nd coat of epoxy to the center third of the interior, as well as the remaining length of the sheers. This area is now ready to be painted.


This area between frames #1 and #2 is ready to be painted.
The aft third of the interior still needs a 2nd coat of epoxy.
Read More..

Chagudax

It used to be that the only way to get your memoir published was to be a famous person or an interesting writer or to have such an interesting life that someone else wanted to write your memoir for you, as told to style. The truth is that a lot of people have had interesting lives and it is too bad that more of them dont write memoirs, but then, what would we do with billions of memoirs.  Where would we store them all?  And if you think about it, a lot of the memoirs would be more or less similar or at least that is what people think.  And so, hardly anyone writes memoirs at least in statistically significant numbers and instead of there being a vast and repetitive glut of memoirs, theres a vast array of lives that have never been documented in print.
So it seems that Andrew Gronholdt had the sense that his life lived mostly in the Aleutians during a time when traditional Aleut culture was rapidly being overcome by the mainstream American culture might be worth putting down in writing.  Apparently, Gronholdt worked at his memoirs but but died without getting them published.  According to the book, Gronholdts daugher, Sharon Gronholdt and her friend, Mike Livingston decided to edit Andrews writings, lay out the book, add photos, many of them taken by Andrew and publish the book themselves though Blurb, a print on demand publisher.
So there it is.  Mike Livingston sent me a copy.  I have leafed through it, looked at the pictures and started reading it.
The title and the cover picture both made me think that the book was primarily about bent wood hat making.  But it isnt.  Its about Andrew Gronholdts life just off the Alaska Peninsula in the north Pacific in the Shumagin Islands, the place where Vitus Bering discovered Alaska and sea otters and set off the chain reaction that led to the colonization of Alaska by the Russians.
The Russians sold Alaska to the Americans who then began to work on Americanizing the native population.  By the time that Andrew Gronholdt was born, the Americanization was just about complete and much or even most of the Aleut culture was disappearing.  Andrew Gronholdt, however, must have had a sense that the culture needed preserving or in the case of wooden hat making, reviving from the death it had suffered a few decades earlier.
The book is lavishly illustrated with photos as well as some of Andrew Gronholdts sketches and working designs for various Aleut inventions, not only the hats but also bailing pumps, fox traps and other things that Andrew was interested in.
The book at a price of $109 a copy is probably not within everyones budget, but if you are interested in Aleut or Alaskan history at the beginning of the twentieth century, you may want to talk your library into getting a copy. Or if you do have the $109 you can get a copy at Blurb.
By the way if you think your own life or the life of someone you know is worth documenting, co-editor Mike Livingston encourages readers to just do it and put together a book and publish it through Blurb or one of the other self-publishing houses.  We probably dont need everyone to write a memoir but a few more might give the humans of the future a bigger window into the past.
Read More..